This guide will help you get started with WHMCS Cart & Order Pages -WCOP in 3 steps.
- Install & Configure WHMCS Module (WHMPress helper)
- Install & Configure WP Plugin (WCOP)
- Using WCOP
In order to get both WHMPress Helper and WCOP, you will need to download complete package from CodeCanyon. Extract the zip file, it contains two folders.
1. WHMCS Module: Contains WHMPress helper. It includes multiple files, one for each supported version of PHP. You will need to use the file corresponding to PHP version in your WHMCS install.
- whmpress_helper-v.3.x.x-php5.6(ioncube-10).zip
- whmpress_helper-v.3.x.x-php7.0(ioncube-10).zip
- whmpress_helper-v.3.x.x-php7.1(ioncube-10).zip
2. WordPress Plugin: Contains installable WordPress plugin.
- whmpress_whmcs_cart-v.x.x.x.zip
1. Install & Configure WHMCS Module – WHMPress Helper
Step 1: Upload WHMpress Helper
Most convenient way to install it is to use File Manager of your hosting panel.
- Select zip file matching your PHP version on your WHMCS install.
- Upload selected zip file in whmcs-install-folder/modules/addons/
- Extract module file.
Or you can do it through FTP
- Select zip file matching your PHP version on your WHMCS install, and extract it to a familiar location on your machine.
- Upload the content (WHMPress folder) in addons folder of your WHMCS install whmcs-install-folder/modules/addons/
Step 2: Activate WHMPress Helper
- Login to your WHMCS admin panel
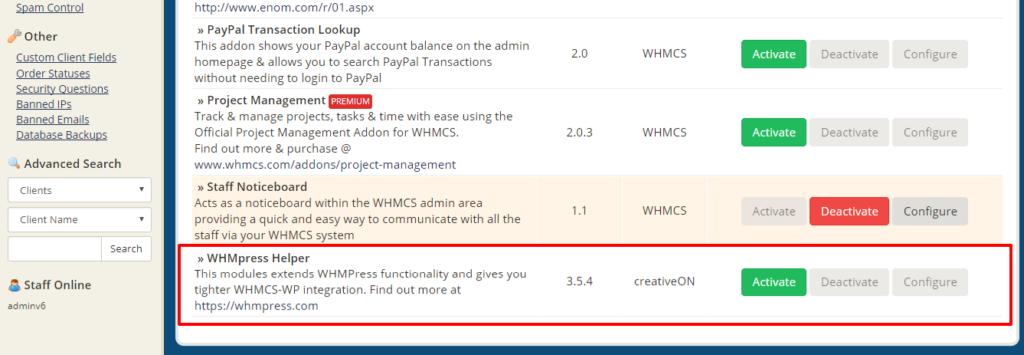
- Activate the WHMpress Helper via the Setup > Addon Modules Menu Item.
Note: There are no configurations needed.
2. Install & Configure WP Plugin (WCOP)
Step 1: Installation
Installation of WCOP is same as any other WordPress plugin.
- Log in to your WP site
- Navigate to Plugins > Add new > Upload
- Select the zip file from downloaded package, i.e. whmpress_whmcs_cart-v.x.x.x.zip
- Click “Upload” and wait until the file is uploaded and extracted.
- Click “Activate Plugin”
Step 2: Configuration
To get started with the configuration, you will first want to make sure you have the following details from your WHMCS install.
- WHMCS System URL: URL to WHMCS home page, you can also get it from WHMCS > setup > WHMCS System URL
- WHMCS Admin User/ Password: A valid WHMCS admin user & password
- api_access & auto_auth Keys: API access key and Auto auth keys are created in WHMCS configuration.php file. To create these keys, add following lines to WHMCS configuration file.
Auto Auth Key is required for WHMCS versions prior to 8.1 but Api Access Key is required in all cases.
//--- keys for API access ---
$api_access_key = 'secret_key_passphrase_goes_here';
$autoauthkey = 'auth_key_passphrase_goes_here';
Replace the placeholders above with strong passwords/ passphrases. You can use this tool to generate strong passphrases
Now that you’ve installed WCOP Plugin, and have gathered the information needed to configure it, head to the plugin settings WP > WCOP > WHMCS Config.
-
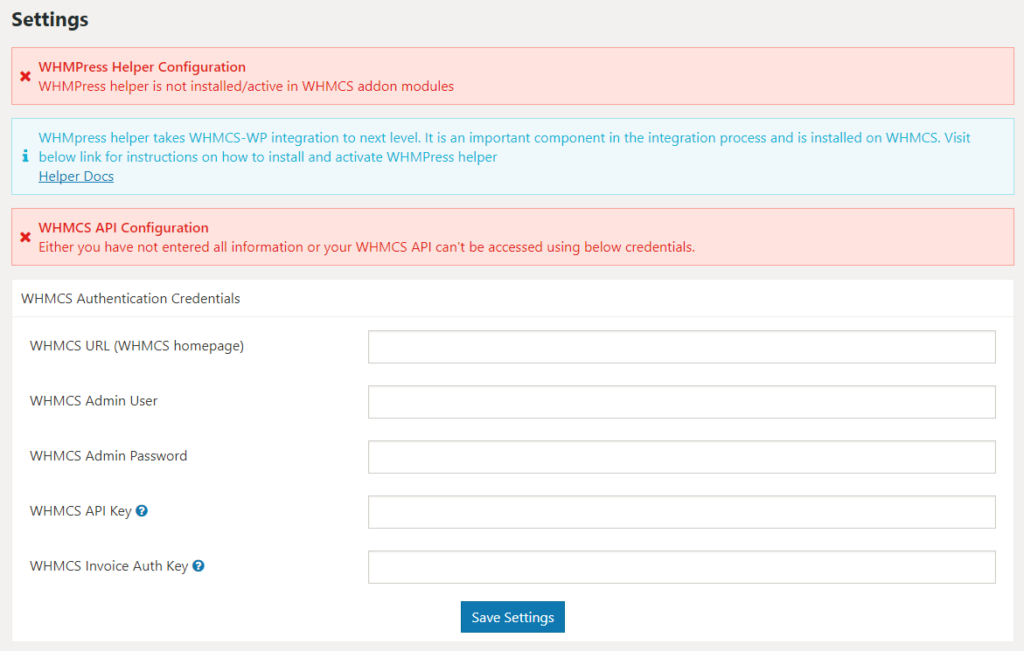
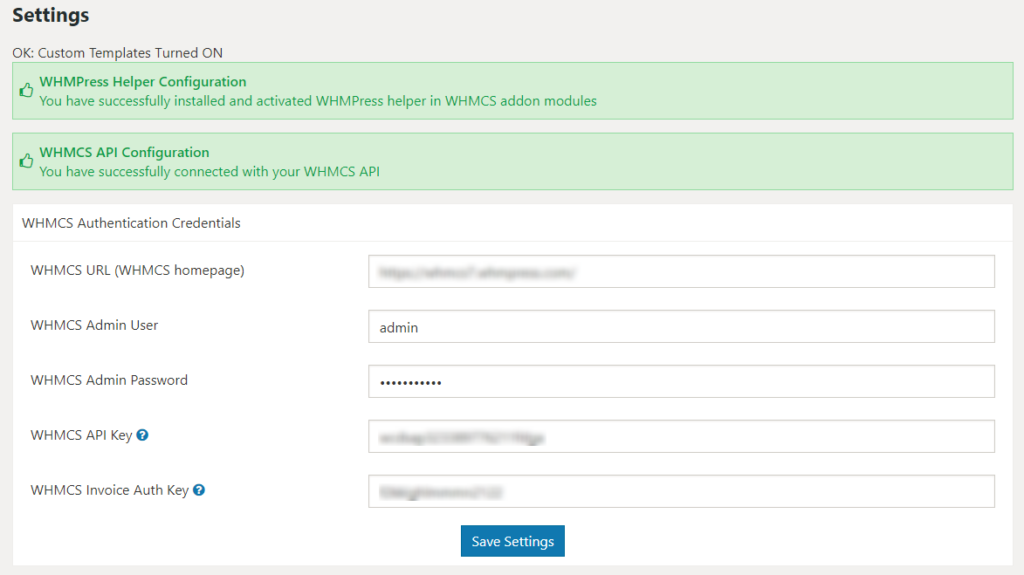
- Fill in WHMCS URL, WHMCS admin user & password, API access key & Auto auth key as collected above.
- Click Save Settings.
If all goes well, you will see two GREEN boxes, indicating a successful linkup of WCOP and WHMCS.
If you see RED boxes, head to WCOM > debug. And visit the troubleshooting section in the documentation.
Video Tutorial
3. Use WCOP
step 1:
- Make a new WP page, paste the shortcode [whmpress_cart_config_product], name as cart or order (or use any name of your choice).
- Make another page, paste the shortcode whmpress_store, name the page store (or use any name of your choice).
step 2:
Open WCOP > Settings > and fill in following fields.
- Order Process URL: URL of order page created in step-1.
- Continue Shopping URL: This can be any page where you want to send users if they click continue shopping during the order. A good place can be page with shortcode whmpress_store
- Order Complete Redirect URL: Where you want to redirect the users when the order is complete, this field is optional.
- Click Save Settings
Head to store page, and place an order.

